Astrill Setup Manual:Getting started with Astrill VPN Routers
Below guide can be with outdated information. You can know more about latest Astrill VPN Routers here on this link - https://www.astrill.com/astrill-vpn-routers
Watch this following video to learn more about advanced features available only on Astrill VPN routers. Astrill VPN router gives you full control over sites and devices you want to tunnel through VPN. It comes with Astrill pre-installed, all you need is to login using your credentials to get started !
<oflash file="" width="1436" height="778" />
Thank you for purchasing the Astrill VPN Router by Sabai Technology.
Please follow the attached instructions to set up the router with your Astrill account settings.
Astrill VPN router standard setup
1. Begin by connecting your Astrill router as follows:
a.   Connect a cable from the Ethernet port on your computer into port 1 of your Astrill router. (After setup you can connect by wireless)
b.   Connect a cable from the Internet/WAN port of your Astrill router into an Ethernet port of your modem or primary router.
c.   Plug in the power to your Astrill router and wait for the power light to be solid. (Note that the E3000 has an actual power button that may need to be turned to the on position.)
2. Next open a web browser on your computer, preferably Google Chrome or Mozilla Firefox and enter 192.168.199.1 in the address bar. (The login and password are admin/astrillpass123.)
3. Your router is pre-set with the wireless information as shown below.
Here are the device settings:
For the Linksys E2000, Linksys E3000, Linksys E4200 and Asus RT-N16:
     IP Address: 192.168.199.1
     Subnet Mask: 255.255.255.0
     Router Control Panel Username: admin
     Router Control Panel Password: astrillpass123
     Wireless 2.4 ghz SSID: Astrill24
     Encryption: WPA2 – Personal / AES: astrillpass123
For the Linksys E3000 only:
     Wireless 5.8 ghz SSID: Astrill58
     Encryption: WPA2 – Personal / AES: astrillpass123
However, if you would like to change the wireless SSID or password/key you can do this from the Network menu. It is easiest to do this before setting up the Astrill VPN service.
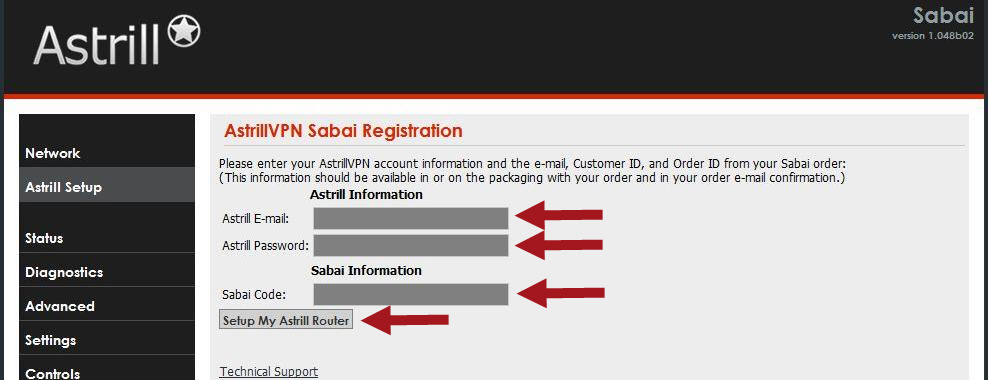
4. Click on the Astrill Setup link in the menu. Enter your Astrill E-mail address, Astrill Password and your Sabai Code (located on a sticker on the bottom of the router) and click Setup My Astrill Router.
5. Your router will connect with the Astrill server and display your account information, available servers and settings, basic setup instructions and support information.
a.   Choose your desired server from the drop down list.
b.   Click the box to “Start Automatically”
c.   Click Connect and your VPN will automatically begin the connection process.
d.   Note that you have Service valid date information as well as current status on this screen.
6. After you have your VPN set up please click on the Diagnostics/System menu and enter the following command and click Execute. This will allow your router to reconnect if there is a power failure or reboot is initiated.
nvram commit
7. If your router is ever completely reset and has lost the registration information you will need to go back to step 2 of these instructions. If you have difficulty with your code, please email support@sabaitechnology.com with your order number and router LAN mac address (found on the Status/Overview page).
Sabai Technology provides technical support for your Astrill VPN router.
If you have any problems with setup or connection or need some technical support with your project, please contact Sabai Tehnology at (864) 962-4072 or email them at support@sabaitechnology.com and they will be happy to help.
Thanks again for purchasing a Sabai Technology router. We hope you enjoy it!

