Astrill Application:UI explained: Difference between revisions
No edit summary |
No edit summary |
||
| Line 8: | Line 8: | ||
# Start automatically, tick this option to start Astrill application automatically when your computers starts-up. | # Start automatically, tick this option to start Astrill application automatically when your computers starts-up. | ||
# Login button, once you enter your login details click on login button to proceed to next screen. | # Login button, once you enter your login details click on login button to proceed to next screen. | ||
# Register account link https://www.astrill.com/pricing.php, if you don't have an account already click on register account link to sign-up with Astrill VPN. | # Register account link [https://www.astrill.com/pricing.php], if you don't have an account already click on register account link to sign-up with Astrill VPN. | ||
# Forgot password link https://members.astrill.com/password-reset.php, if you forgot or lost your password, click on forgot password link and you will receive a reset password link in your email. | # Forgot password link [https://members.astrill.com/password-reset.php], if you forgot or lost your password, click on forgot password link and you will receive a reset password link in your email. | ||
# Settings menu, here you will lots of features and settings. | # Settings menu, here you will lots of features and settings. | ||
# Help menu, here you will lots of other features and settings. | # Help menu, here you will lots of other features and settings. | ||
Revision as of 07:35, 3 September 2012
Astrill application UI explained
Login screen
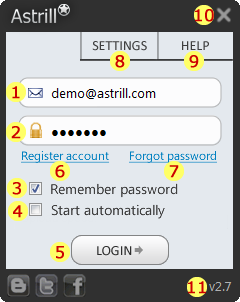
- Username field, here you enter your Astrill VPN account email address.
- Password field, here you enter your Astrill VPN account password.
- Remember password check-box, tick this option to remember your login details, and next time you run Astrill you will be logged on automatically.
- Start automatically, tick this option to start Astrill application automatically when your computers starts-up.
- Login button, once you enter your login details click on login button to proceed to next screen.
- Register account link [1], if you don't have an account already click on register account link to sign-up with Astrill VPN.
- Forgot password link [2], if you forgot or lost your password, click on forgot password link and you will receive a reset password link in your email.
- Settings menu, here you will lots of features and settings.
- Help menu, here you will lots of other features and settings.
- Close button, when you click on the X button this will minimize Astrill to system tray and Astrill be be still running.
- Version number, if you hover over version number you will see exact sub-version you currently have installed.
OpenWeb mode main screen
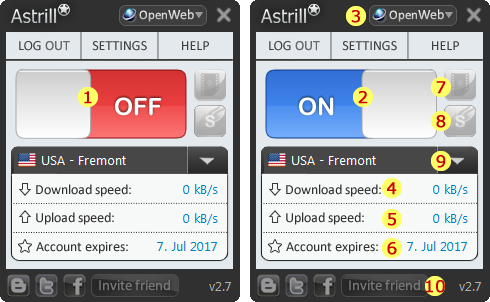
- RED OFF button, click on OFF button to connect to Astrill VPN.
- BLUE ON button, click on ON button to disconnect from Astrill VPN.
- VPN mode button, when you click on VPN mode button you can switch between VPN modes such as OpenWeb and OpenVPN.
- Download speed indicator, here you will see current downloading speed if there is traffic passing though Astrill VPN.
- Upload speed indicator, here you will see current uploading speed if there is traffic passing though Astrill VPN.
- Account expires indicator, here you will see when your Astrill VPN membership expires.
- Video recorder button, you can quickly toggle Video recorder feature.
- Smart mode button, you can quickly toggle Smart mode feature.
- Servers list, click on the arrow button, and you will see VPN servers list.
- Invite friend button, when you are logged on Astrill, you can send invites to your friends. For every friend who clicks on your invite link and joins, you get rewarded with 30 days to your account expiry.
NOTE: In Astrill application OpenWeb mode you can switch between VPN servers quickly without having to disconnect from VPN.
We have simplified features and settings options, they are call basic and expert. In basic settings mode you see only few features and settings options. In expert settings mode you see all features and settings options. We did this because we don't want to confuse novice users, and other reason is to give all features and options to experienced users.
- Switch to Expert, currently you are in basic settings mode, click on Switch to Expert option to show all features and settings.
- Switch to Basic, currently you are in expert settings mode, click on Switch to Basic option to show basic features and settings.
OpenVPN mode main screen
- VPN Mode button, click on VPN mode button and select OpenVPN mode option.
- VPN servers list, click on arrow button to show VPN servers list, and select a VPN servers of your choice.
- RED OFF button, click on OFF button to connect to Astrill OpenVPN.
- Process bar indicator, here you will progress and status of OpenVPN connection.
- Lock icon, once you are connected to OpenVPN mode, you will see a lock icon instead of arrow button.
- BLUE ON button, click on ON button to disconnect from Astrill OpenVPN.
NOTE: In Astrill application OpenVPN mode you can switch between VPN servers only after you have disconnected from VPN.
We have simplified features and settings options, they are call basic and expert. In basic settings mode you see only few features and settings options. In expert settings mode you see all features and settings options. We did this because we don't want to confuse novice users, and other reason is to give all features and options to experienced users. Please note that OpenWeb mode and OpenVPN mode menus might look similar, but in fact features and settings options are different.
- Switch to Expert, currently you are in basic settings mode, click on Switch to Expert option to show all features and settings.
- Switch to Basic, currently you are in expert settings mode, click on Switch to Basic option to show basic features and settings.
References: Template:Reflist


