P2P: Difference between revisions
No edit summary |
|||
| (4 intermediate revisions by one other user not shown) | |||
| Line 4: | Line 4: | ||
=== Connect to P2P VPN server === | === Connect to P2P VPN server === | ||
When you login to Astrill VPN, first thing you must do is select a '''P2P VPN server''' and then connect. VPN Servers which allows '''P2P/Torrent/eMule/eDonkey''' traffic are marked with a star ([[File:Star-server-p2pm.png]]) in Astrill application and [https://members.astrill.com/servers | When you login to Astrill VPN, first thing you must do is select a '''P2P VPN server''' and then connect. VPN Servers which allows '''P2P/Torrent/eMule/eDonkey''' traffic are marked with a star ([[File:Star-server-p2pm.png]]) in Astrill application and [https://members.astrill.com/tools/vpn-servers Servers List]. Before you connect to OpenVPN/StealthVPN, you need to enable Port Forwarding. From Astrill Click on '''SETTINGS > Port Forward...''', and then click on '''Enable Port Forwarding'''. | ||
[[File:P2p-bittorrent-with-astrill-vpn-01.jpg]] | [[File:P2p-bittorrent-with-astrill-vpn-01.jpg]] | ||
=== Set Forwarded Port on P2P Client === | === Set Forwarded Port on P2P Client === | ||
==== uTorrent | ==== <u>uTorrent</u> ==== | ||
From uTorrent open '''Preferences''', and click on '''Connection'''. | From uTorrent open '''Preferences''', and click on '''Connection'''. | ||
| Line 25: | Line 24: | ||
==== Vuze | ==== <u>Vuze</u> ==== | ||
Tools > Options | '''Tools > Options''', then select '''Connection options''' | ||
http://wiki.vuze.com/w/UG_Options#Connection_options | http://wiki.vuze.com/w/UG_Options#Connection_options | ||
[[ | [[File:Vuze-port-forward.png]] | ||
Simply set the same port number you see in Astrill Port Forward for both UDP and TCP listening port on Vuze. | |||
'''Tools > Options''', then select '''Advanced Network Settings''' | |||
http://wiki.vuze.com/w/UG_Options#Advanced_Network_Settings | http://wiki.vuze.com/w/UG_Options#Advanced_Network_Settings | ||
Sometimes you get prompted to bind adapter as you are using Astrill VPN adapter. | Sometimes you get prompted to bind adapter as you are using Astrill VPN adapter. Just click on Yes button and this will be set for you automatically. | ||
http://wiki.vuze.com/w/Proxies_And_VPNs#VPN_Configuration | http://wiki.vuze.com/w/Proxies_And_VPNs#VPN_Configuration | ||
| Line 45: | Line 47: | ||
If you don't get prompted, simply | If you don't get prompted, simply follow above steps to manually bind Astrill VPN adapter in Vuze P2P client. This ensures all P2P traffic is passed over Astrill VPN. | ||
[[File:Vuze-bind2.png]] | |||
On Mac OS X, you need to set '''tun0''' for interface, and then click on Save button. | |||
[[File:Vuze- | [[File:Vuze-interface-tun0.jpg]] | ||
Latest revision as of 18:22, 21 May 2018
Configure P2P Client
Connect to P2P VPN server
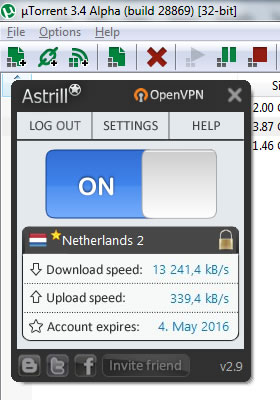
When you login to Astrill VPN, first thing you must do is select a P2P VPN server and then connect. VPN Servers which allows P2P/Torrent/eMule/eDonkey traffic are marked with a star (![]() ) in Astrill application and Servers List. Before you connect to OpenVPN/StealthVPN, you need to enable Port Forwarding. From Astrill Click on SETTINGS > Port Forward..., and then click on Enable Port Forwarding.
) in Astrill application and Servers List. Before you connect to OpenVPN/StealthVPN, you need to enable Port Forwarding. From Astrill Click on SETTINGS > Port Forward..., and then click on Enable Port Forwarding.
Set Forwarded Port on P2P Client
uTorrent
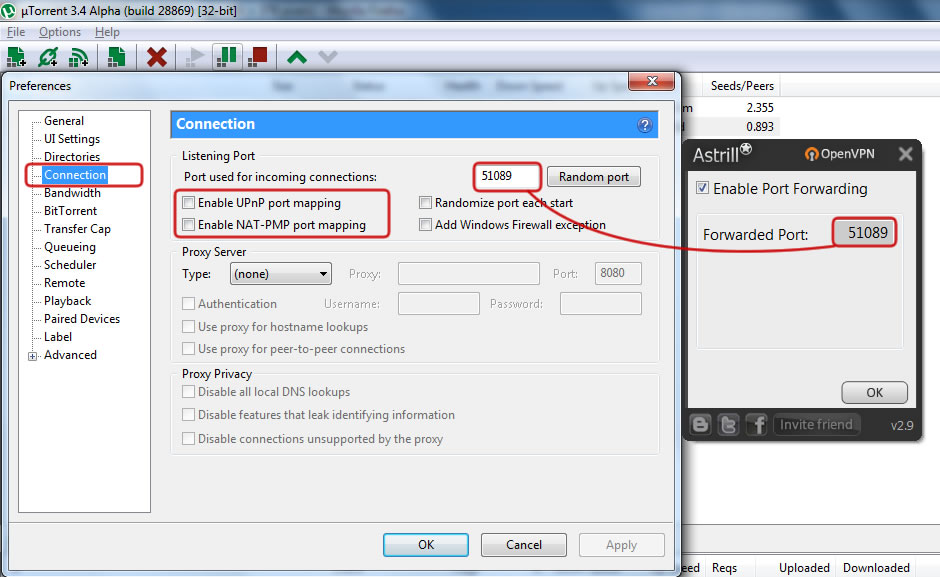
From uTorrent open Preferences, and click on Connection.
   Un-Tick check-box: Enable UPnP port mapping
   Un-Tick check-box: Enable NAT-PMP port mapping
   Port: 51089 (set port from Astrill application, your port will be different)
Also it's recommended you disable UPnP port mapping on your modem/router as well. This improves performance on your router, and prevents any possible conflicts on the network with the VPN connections.
Vuze
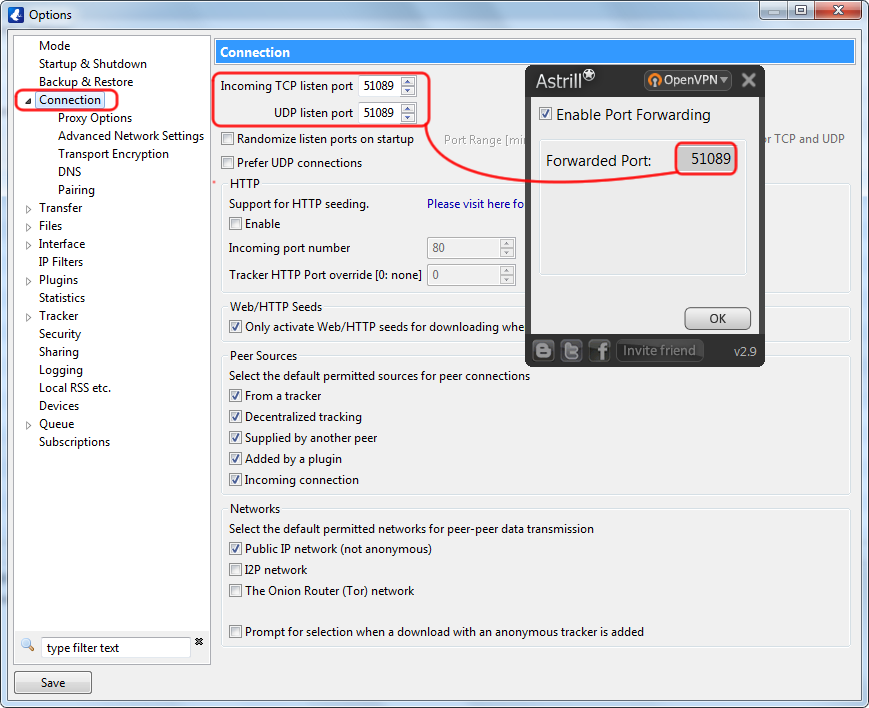
Tools > Options, then select Connection options
http://wiki.vuze.com/w/UG_Options#Connection_options
Simply set the same port number you see in Astrill Port Forward for both UDP and TCP listening port on Vuze.
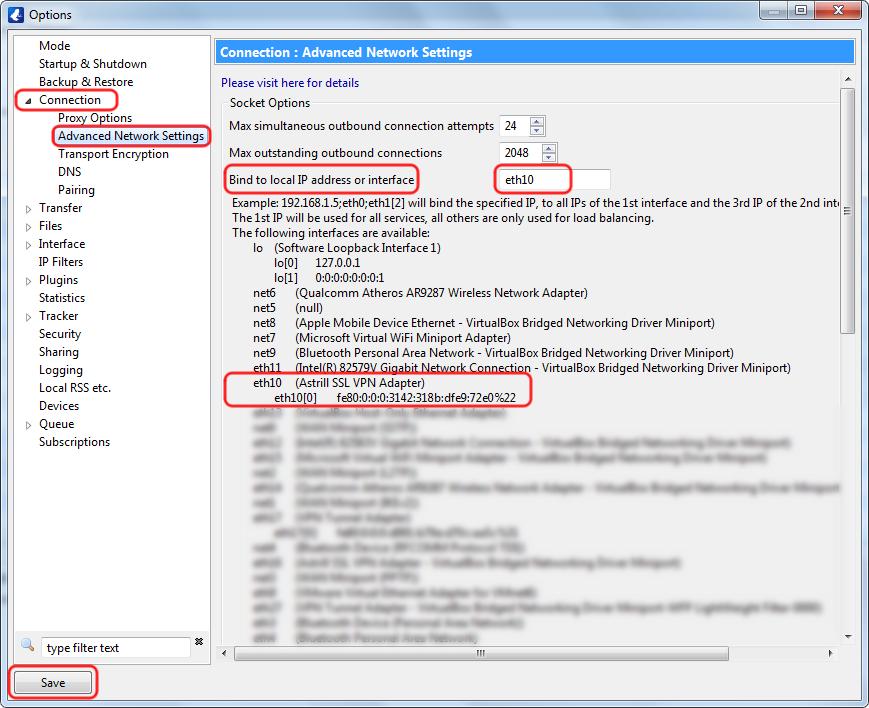
Tools > Options, then select Advanced Network Settings
http://wiki.vuze.com/w/UG_Options#Advanced_Network_Settings
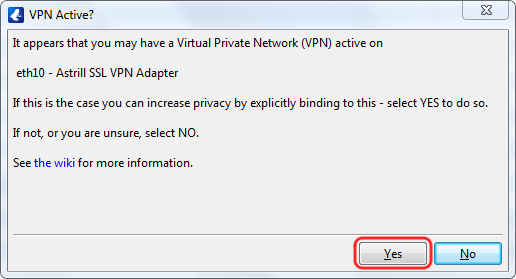
Sometimes you get prompted to bind adapter as you are using Astrill VPN adapter. Just click on Yes button and this will be set for you automatically.
http://wiki.vuze.com/w/Proxies_And_VPNs#VPN_Configuration
If you don't get prompted, simply follow above steps to manually bind Astrill VPN adapter in Vuze P2P client. This ensures all P2P traffic is passed over Astrill VPN.
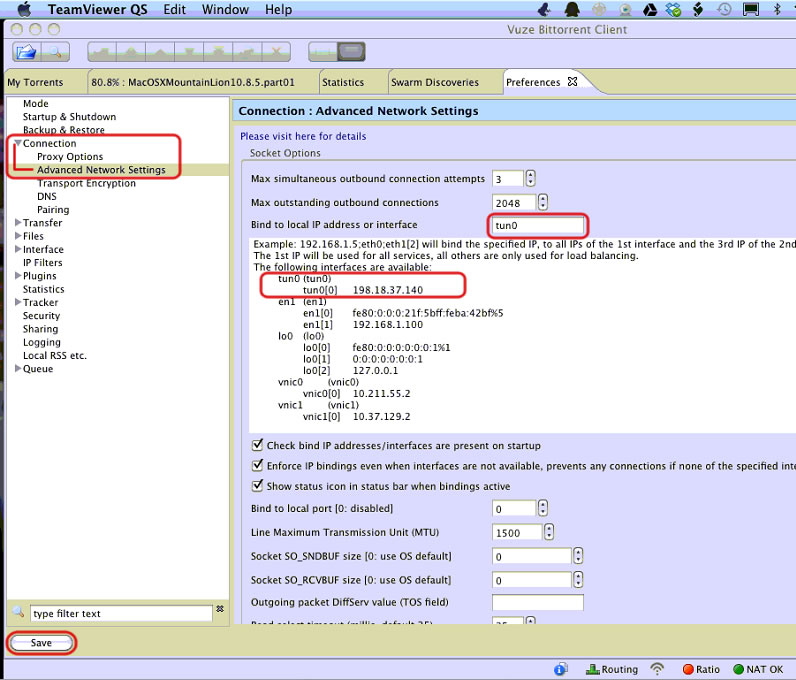
On Mac OS X, you need to set tun0 for interface, and then click on Save button.
Prevent P2P Traffic Leaks
Arm the Windows Firewall + Disable IPv6 + Stop DNS Leaks - set once and forget, then you can enjoy all your p2p/torrent downloads.
Setup Windows Firewall rules for uTorrent
See the following article in details how to Block uTorrent traffic completely so uTorrent only works if Astrill VPN connection is active.
Disable IPv6 – Disabling isatap Teredo and 6to4 (on Windows 7)
Run command prompt (CMD.EXE) as administrator, and then call the following commands:
    netsh int ipv6 isatap set state disabled
    netsh int ipv6 6to4 set state disabled
    netsh interface teredo set state disable
This method is very convenient, because you don't need to uninstall drivers/devices, and nor disable IPv6 protocol on every network connection adapter.
DNS Leak Protection
Astrill application has DNS leak protection implemented in place already. As soon as you connect to OpenVPN/StealthVPN with Astrill application, DNS server on your network adapter which provides Internet is changed to 8.8.8.8. When you disconnect from Astrill VPN, DNS server settings are restored back to your previous settings. You can manually set DNS server to any of the follow popular public DNS servers:
Google Public DNS
   Preferred DNS server: 8.8.8.8
   Alternate DNS server: 8.8.4.4
Open DNS
   Preferred DNS server: 208.67.222.222
   Alternate DNS server: 208.67.222.220
Comodo Secure DNS
   Preferred DNS server: 8.26.56.26
   Alternate DNS server: 8.20.247.20
