Astrill Application:OpenWeb Features: Difference between revisions
No edit summary |
|||
| (9 intermediate revisions by the same user not shown) | |||
| Line 1: | Line 1: | ||
== Browser Selection == | == Browser Selection == | ||
Browser Selection helps you to select which browser will tunnel thru Astrill Application | Browser Selection helps you to select which browser will tunnel thru Astrill Application | ||
[[File:Openweb_browsers.jpg]] | |||
[[File:Openweb_browsers.jpg|border]] | |||
1. Click '''SETTINGS''' | 1. Click '''SETTINGS''' | ||
| Line 11: | Line 14: | ||
4. Click '''OK''' | 4. Click '''OK''' | ||
== Site Filter == | == Site Filter == | ||
| Line 18: | Line 23: | ||
[[File:Openweb_sitefilter.jpg]] | [[File:Openweb_sitefilter.jpg|border]] | ||
1. '''Site Filter''' feature is under the '''SETTINGS''' Menu. | 1. '''Site Filter''' feature is under the '''SETTINGS''' Menu. | ||
| Line 33: | Line 38: | ||
This mode will allow all sites to go through VPN and is highly recommended for privacy protection. | This mode will allow all sites to go through VPN and is highly recommended for privacy protection. | ||
[[File: Sitefilter-tunnelallsites.jpg]] | [[File: Sitefilter-tunnelallsites.jpg|border]] | ||
1. To choose Tunnel all Sites mode, click on '''SETTINGS''' menu then choose '''Site Filter'''. | 1. To choose Tunnel all Sites mode, click on '''SETTINGS''' menu then choose '''Site Filter'''. | ||
| Line 40: | Line 45: | ||
3. Click '''OK''', now all sites will go through VPN. | 3. Click '''OK''', now all sites will go through VPN. | ||
=== Tunnel only those sites === | === Tunnel only those sites === | ||
This mode will allow you to specify the only site/s you wish to go through VPN. | This mode will allow you to specify the only site/s you wish to go through VPN. | ||
[[File: | [[File:Sf-tunnelonlythesesites.jpg|border]] | ||
1. Click on the '''SETTINGS''' menu and choose '''Site Filter'''. | |||
2. Click the drop down arrow and select '''Tunnel only these sites'''. | |||
3. Enter the site you want to tunnel only via VPN (Example: google.com) | |||
4. Click '''OK''' to save. | |||
=== Exclude these sites === | === Exclude these sites === | ||
'''Exclude these sites''', this mode will allow you to exclude site/s to go through VPN. | |||
1. Click the drop down arrow and select Exclude these sites. | [[File:Sf-excludethesesites.jpg|border]] | ||
1. Click on the '''SETTINGS''' menu and choose '''Site Filter'''. | |||
2. Click the drop down arrow and select '''Exclude these sites'''. | |||
3. Enter which site/s you do not want to tunnel through VPN, for example google.com. | |||
4. Click '''OK''' to save. | |||
== Ads Blocker == | == Ads Blocker == | ||
| Line 69: | Line 88: | ||
Ads Blocker is used to block annoying ads. It works in all browsers. Ads Blocker consists of a set of rules which are compatible with Ad Block Plus for Firefox. | Ads Blocker is used to block annoying ads. It works in all browsers. Ads Blocker consists of a set of rules which are compatible with Ad Block Plus for Firefox. | ||
[[File:Openweb_ads-blocker.jpg|border]] | |||
1. '''Ads Blocker''' is under '''SETTINGS'''. | |||
2. By clicking '''Enable Ads blocker''', you can specify what ad you want to block or you can simply click Block useless sites. | |||
3. Click '''OK''' to save the settings. | |||
== Smart Mode == | |||
'''Smart Mode (a.k.a. GFW Mode)''' is made specifically for customers in China with a goal to accelerate web surfing. When Smart Mode is enabled (in the Settings Menu), only blocked sites will be opened through Astrill servers, while all other sites (local sites) will be loaded directly. | |||
[[File:Openweb-smartmode.jpg|border]] | |||
1. Click on the '''SETTINGS''' menu. | |||
2. Click on '''Smart Mode''' to enable the feature. | |||
3. If you click on the '''SETTINGS''' menu again, you will see that '''Smart Mode''' is already enabled. | |||
== OpenWeb Options == | == OpenWeb Options == | ||
Openweb options | Under '''Openweb options''', you are allowed to choose which port combination you want to use or you can test which port combination will work best for you. | ||
[[File:Openweb_options1.jpg|border]] | |||
4. Sets system global proxy automatically when Astrill is enabled. This affects all applications which use system proxy setting. This option is disabled by default. In case "auto tunnel apps" does not redirect your application automatically, try to enable this option. | 1. Click on '''SETTINGS''' and then choose '''Openweb Options'''. | ||
2. In '''Tunnel''' mode, you can choose whether to tunnel only web browsers ('''Browsers''') or all applications ('''All Apps'''). | |||
3. In '''Port''', port is set to 443 by default. You can change it to 80, ALTA or ALTB (alta and altb can be random port assigned by server) and see which one works for you. | |||
4. In '''Protocol''', '''ver2''' (version 2) is for users where ISP throttles torrents and unknown traffic. Some antivirus software is confused with Openweb ver2 protocol, so it will break it. In such case, you can use '''ver 1''' (version 1). | |||
5. '''Auto Tunnel Apps'''. When this option is enabled, Astrill will use system-wide Network Redirector Component to tunnel web traffic from applications automatically. No need to set system proxy. This option works with all major web browser. | |||
6. '''Set System Proxy'''. Sets system global proxy automatically when Astrill is enabled. This affects all applications which use system proxy setting. This option is disabled by default. In case "auto tunnel apps" does not redirect your application automatically, try to enable this option. | |||
7. '''Show logo in Firefox'''. This shows Astrill logo in Firefox address bar when Astrill is enabled. | |||
== Advanced Options == | == Advanced Options == | ||
| Line 124: | Line 144: | ||
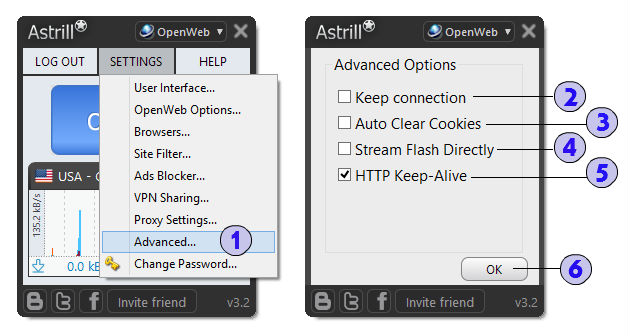
Advanced options will allow you to toggle on/off settings and features. | Advanced options will allow you to toggle on/off settings and features. | ||
[[File: | [[File:Openweb_advanced-options.jpg|border]] | ||
1. Click on '''SETTINGS''' and then choose '''Advanced...'''. | |||
2. '''Keep connection''' – This option lets you keep connection even when you switch to another Astrill server (from drop-down list) or when you turn Astrill OFF (using ON/OFF button). This is especially useful when you are downloading a file and want to switch to another server. Normally Astrill would disconnect all connections thus your download would be aborted. With this new option you can change this behavior. | |||
3. '''Auto Clear Cookies''' - This option, when checked, will tell Astrill to clear all browser and Flash cookies whenever you switch to another sever or turn Astrill ON or OFF. This is very useful for some web sites which remember you using cookies, so even if you are using VPN, they will know your default location. We have also added an option to the tray/context menu “Clear Cookies” which you can use to manually clear all cookies whenever you wish. This is very convenient too as it clears nasty Flash Cookies which are normally very hard to remove (you would need to go to Adobe web site to do that). When we are at explaining how sites tracking your location by cookies, let’s mention that some sites (like syfy.com) track your timezone as well ! Thus even if you are using VPN, that site will show you are not in USA and will not let you watch any videos. This is very easy to fix – just set your system timezone to let’s say UTC-8 which is California time zone. (you might need to restart browser or refresh the page – Ctrl-F5) | |||
4. '''Stream Flash Directly''' – This option tries to stream flash videos directly (without VPN). Some sites don’t check location when streaming (Hulu is an exception tho). Thus using this option you can speed up your video streaming but usually our VPN is very fast thus you will not notice any difference. | |||
5. '''HTTP Keep-Alive''' - This option will keep connection with our server across browser request. Normally you should keep this enabled for faster surfing speed. If you have a lot of tabs open in a web browser or a lot of tabs with facebook and you see frequently "Too Many Connections" error, try to disable this option. | |||
6. Click '''OK''' to save changes. | |||
Latest revision as of 05:00, 26 June 2017
Browser Selection
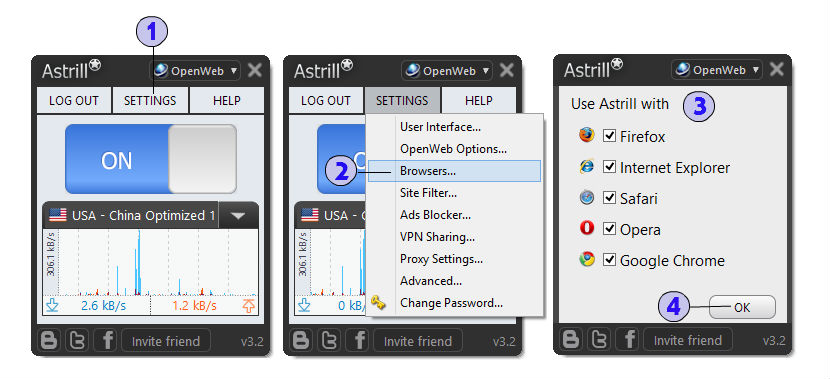
Browser Selection helps you to select which browser will tunnel thru Astrill Application
1. Click SETTINGS
2. Click Browser
3. Select Internet Browser you want to tunnel
4. Click OK
Site Filter
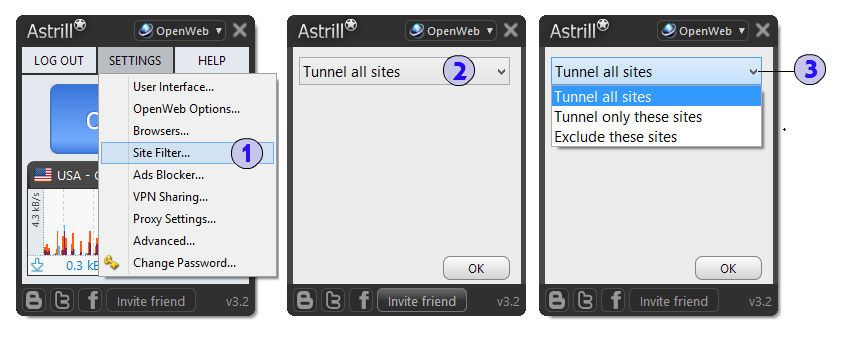
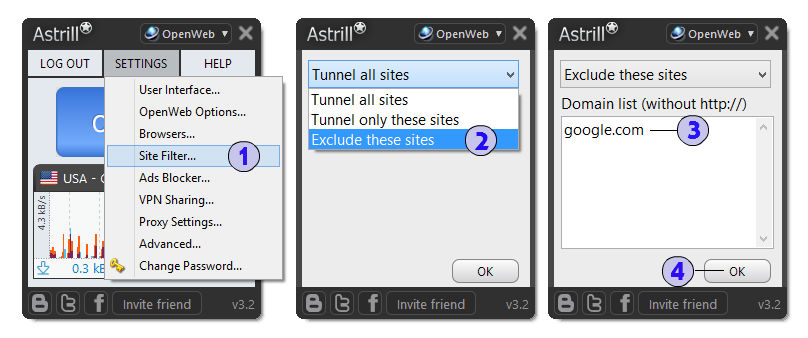
Site Filter is one of the Openweb features that will give you options which sites you want to go through VPN.
1. Site Filter feature is under the SETTINGS Menu.
2. Once you click on the Site Filter feature, you will see it is set to "Tunnel all Sites" mode as default.
3. Site Filter modes, click on the drop down arrow button to show the Site Filter modes such as "Tunnel all sites", "Tunnel only these sites" and "Exclude these sites".
Tunnel all sites
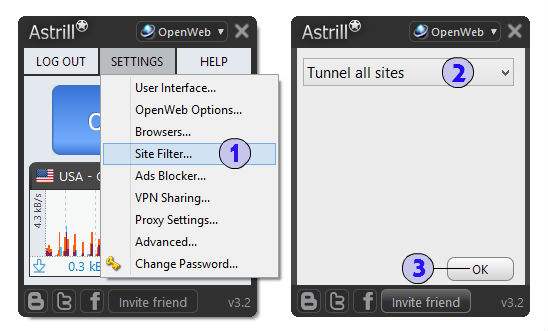
This mode will allow all sites to go through VPN and is highly recommended for privacy protection.
1. To choose Tunnel all Sites mode, click on SETTINGS menu then choose Site Filter.
2. By default it is set to Tunnel all Sites mode.
3. Click OK, now all sites will go through VPN.
Tunnel only those sites
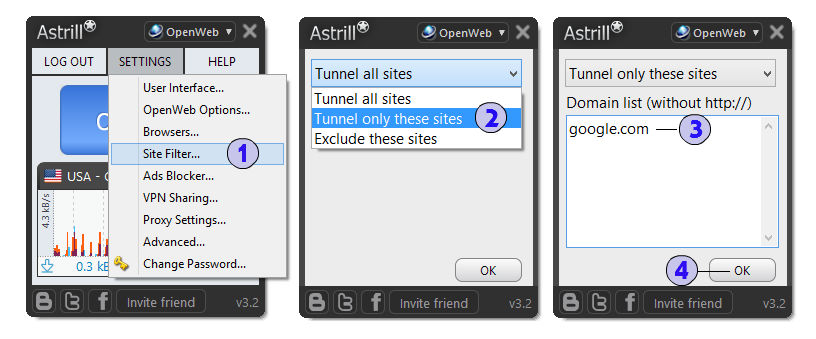
This mode will allow you to specify the only site/s you wish to go through VPN.
1. Click on the SETTINGS menu and choose Site Filter.
2. Click the drop down arrow and select Tunnel only these sites.
3. Enter the site you want to tunnel only via VPN (Example: google.com)
4. Click OK to save.
Exclude these sites
Exclude these sites, this mode will allow you to exclude site/s to go through VPN.
1. Click on the SETTINGS menu and choose Site Filter.
2. Click the drop down arrow and select Exclude these sites.
3. Enter which site/s you do not want to tunnel through VPN, for example google.com.
4. Click OK to save.
Ads Blocker
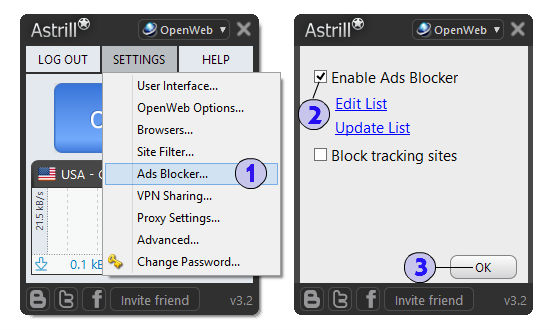
Ads Blocker is used to block annoying ads. It works in all browsers. Ads Blocker consists of a set of rules which are compatible with Ad Block Plus for Firefox.
1. Ads Blocker is under SETTINGS.
2. By clicking Enable Ads blocker, you can specify what ad you want to block or you can simply click Block useless sites.
3. Click OK to save the settings.
Smart Mode
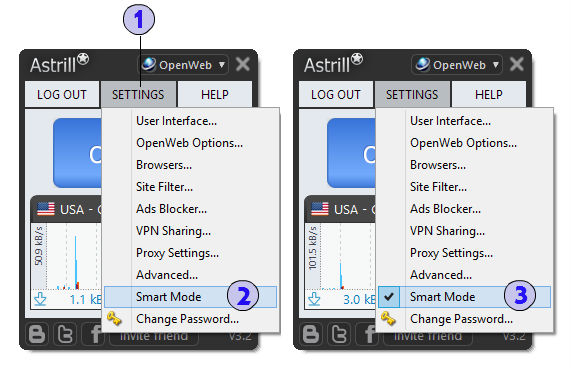
Smart Mode (a.k.a. GFW Mode) is made specifically for customers in China with a goal to accelerate web surfing. When Smart Mode is enabled (in the Settings Menu), only blocked sites will be opened through Astrill servers, while all other sites (local sites) will be loaded directly.
1. Click on the SETTINGS menu.
2. Click on Smart Mode to enable the feature.
3. If you click on the SETTINGS menu again, you will see that Smart Mode is already enabled.
OpenWeb Options
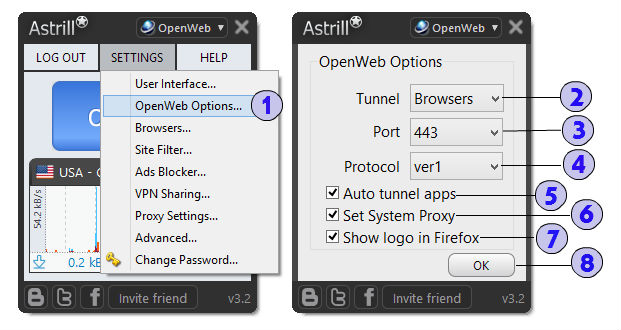
Under Openweb options, you are allowed to choose which port combination you want to use or you can test which port combination will work best for you.
1. Click on SETTINGS and then choose Openweb Options.
2. In Tunnel mode, you can choose whether to tunnel only web browsers (Browsers) or all applications (All Apps).
3. In Port, port is set to 443 by default. You can change it to 80, ALTA or ALTB (alta and altb can be random port assigned by server) and see which one works for you.
4. In Protocol, ver2 (version 2) is for users where ISP throttles torrents and unknown traffic. Some antivirus software is confused with Openweb ver2 protocol, so it will break it. In such case, you can use ver 1 (version 1).
5. Auto Tunnel Apps. When this option is enabled, Astrill will use system-wide Network Redirector Component to tunnel web traffic from applications automatically. No need to set system proxy. This option works with all major web browser.
6. Set System Proxy. Sets system global proxy automatically when Astrill is enabled. This affects all applications which use system proxy setting. This option is disabled by default. In case "auto tunnel apps" does not redirect your application automatically, try to enable this option.
7. Show logo in Firefox. This shows Astrill logo in Firefox address bar when Astrill is enabled.
Advanced Options
Advanced options will allow you to toggle on/off settings and features.
1. Click on SETTINGS and then choose Advanced....
2. Keep connection – This option lets you keep connection even when you switch to another Astrill server (from drop-down list) or when you turn Astrill OFF (using ON/OFF button). This is especially useful when you are downloading a file and want to switch to another server. Normally Astrill would disconnect all connections thus your download would be aborted. With this new option you can change this behavior.
3. Auto Clear Cookies - This option, when checked, will tell Astrill to clear all browser and Flash cookies whenever you switch to another sever or turn Astrill ON or OFF. This is very useful for some web sites which remember you using cookies, so even if you are using VPN, they will know your default location. We have also added an option to the tray/context menu “Clear Cookies” which you can use to manually clear all cookies whenever you wish. This is very convenient too as it clears nasty Flash Cookies which are normally very hard to remove (you would need to go to Adobe web site to do that). When we are at explaining how sites tracking your location by cookies, let’s mention that some sites (like syfy.com) track your timezone as well ! Thus even if you are using VPN, that site will show you are not in USA and will not let you watch any videos. This is very easy to fix – just set your system timezone to let’s say UTC-8 which is California time zone. (you might need to restart browser or refresh the page – Ctrl-F5)
4. Stream Flash Directly – This option tries to stream flash videos directly (without VPN). Some sites don’t check location when streaming (Hulu is an exception tho). Thus using this option you can speed up your video streaming but usually our VPN is very fast thus you will not notice any difference.
5. HTTP Keep-Alive - This option will keep connection with our server across browser request. Normally you should keep this enabled for faster surfing speed. If you have a lot of tabs open in a web browser or a lot of tabs with facebook and you see frequently "Too Many Connections" error, try to disable this option.
6. Click OK to save changes.
