Astrill Application:Other Features and Options: Difference between revisions
| Line 174: | Line 174: | ||
<BR> | <BR> | ||
<BR> | <BR> | ||
'''Note2:''' We even provide '''pre-installed routers''' with Astrill VPN at very '''affordable rates'''. All Astrill VPN routers come '''preinstalled''' with Astrill VPN and ready to use immediately. You get access to all Astrill VPN servers (''' | '''Note2:''' We even provide '''pre-installed routers''' with Astrill VPN at very '''affordable rates'''. All Astrill VPN routers come '''preinstalled''' with Astrill VPN and ready to use immediately. You get access to all Astrill VPN servers ('''330 servers in 50 countries''' with '''free and unlimited switches'''), and you have option to add '''private IPs''' as well. You can order them from this page - https://www.astrill.com/astrill-vpn-routers.php | ||
== Speed Test == | == Speed Test == | ||
Revision as of 07:35, 13 June 2017
VPN Modes
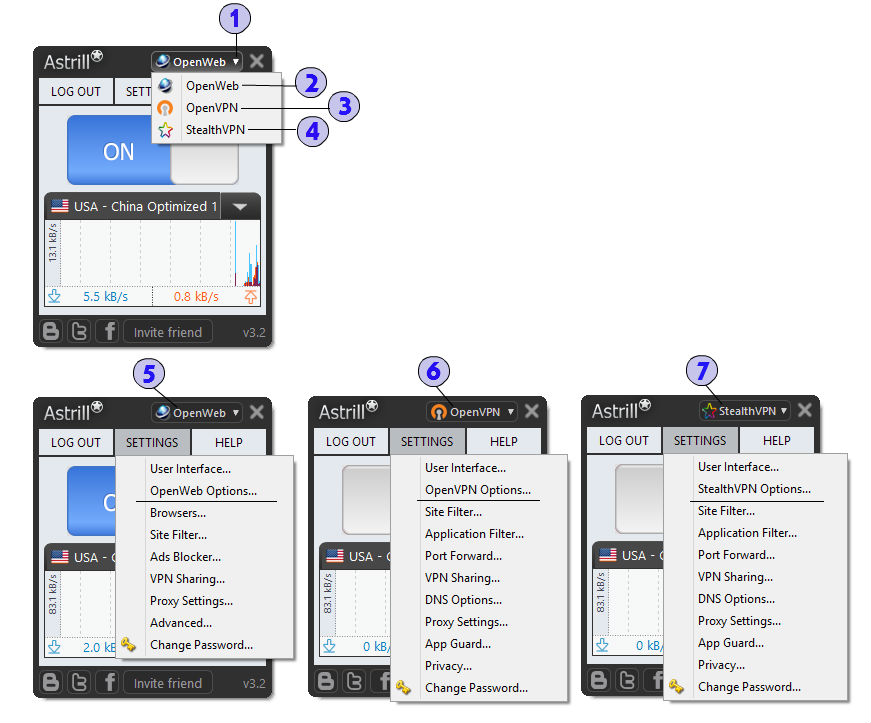
Astrill application has 3 Modes of VPN, OpenWeb, OpenVPN and StealthVPN, you can switch between these protocols with a single click.
- You can switch between modes from the Astrill app title bar. By default, Astrill app is set to Openweb mode. Click on the drop down arrow to show other modes.
- OpenWeb Mode works in all major Web Browsers (Firefox, Internet Explorer, Opera, Safari, Google Chrome). This VPN usually offers faster surfing speeds and has more features. It is also suitable for web surfing and streaming videos websites (such as YouTube, Vimeo, Vevo, and many others).
- OpenVPN Mode is based on industry standard SSL encryption (AES or BlowFish). Traffic from all applications is protected and this VPN works also with P2P applications (Bittorrent).
- StealthVPN brings better security with 2-layer encryption. Works on Windows/Mac/Linux/android. Works even in countries with high censorship, like China, UAE, Syria, etc.
- If you're in Openweb, click on the SETTINGS menu to see Openweb Options.
- If you choose OpenVPN, click on the SETTINGS menu, it automatically switches to OpenVPN Options.
- If you choose StealthVPN, click on the SETTINGS menu, it automatically switches to StealthVPN Options.
User Interface
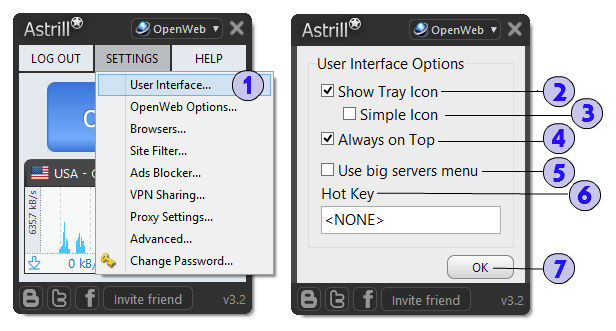
This feature allows you to customize the visibility of your Astrill application. By default, Show Tray Icon and Always on Top is selected as you can see from the picture below.
1. Click on SETTINGS menu and choose User Interface....
2. Show Tray Icon - This shows Astrill icon in the system tray, blinking while connected to server.
3. Simple Icon - This shows Astrill icon in the system tray which doesn't blink.
4. Always on Top - This keeps Astrill on top of other windows.
5. Use big servers menu - This will show a big drop down menu with servers list which makes it easier to find a server.
6. Hot Key - This will set system global Hot-key which toggles Astrill ON/OFF.
7. Click OK to save changes.
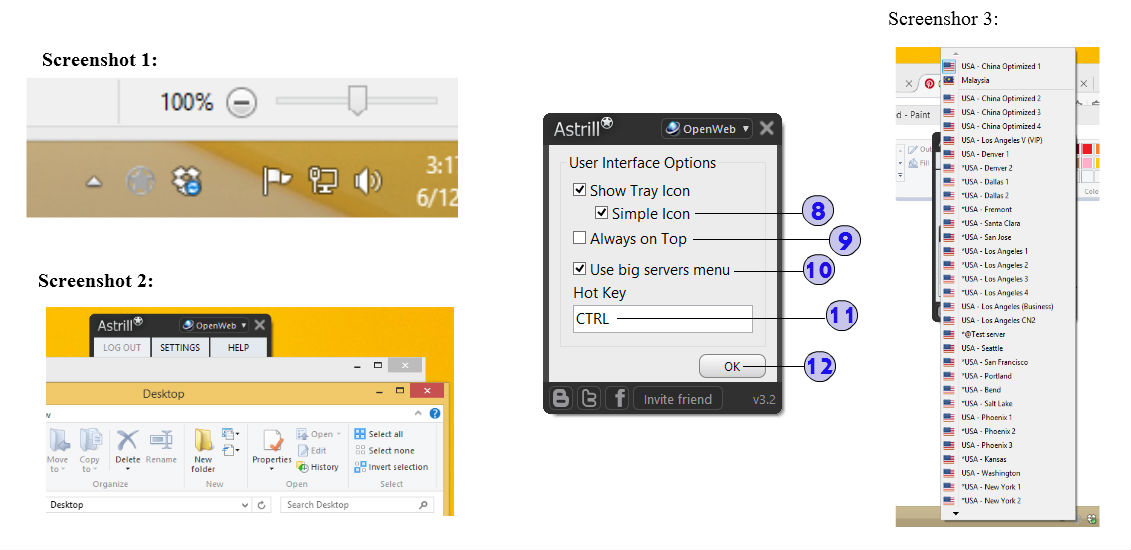
8. If you tick Simple Icon, it will show Astrill simple icon which does not blink from system tray as shown from Screenchot 1.
9. If you untick Always on Top, this will show Astrill windows from the background as shown from Screenshot 2.
10. If you tick Use big servers menu, this will expand servers list to a big drop down menu of servers as shown from Screenshot 3.
11. If you set CTRL as Hot key, you can start using CTRL button to toggle Astrill app ON/OFF.
12. Always click OK for every changes you made.
Proxy Settings
Astrill has a Proxy (optional) Feature for users who are on company, school or work place network which requires clients to use proxy to gain internet access. So if you intent to use proxy, then the only way Astrill will work for you is if you put proxy settings. We support HTTP, HTTPS, SOCKS4, SOCKS4a, SOCKS5... proxy type.
1. Click on SETTINGS menu and choose Proxy Settings... option.
2. By default, it is set to No Proxy.
3. If you click on the drop down arrow, you can see the other option such as HTTP, HTTPS, SOCKS4, SOCKS4a, SOCKS5.
4. For example you choose HTTP proxy from school, you have to choose HTTP.
5. Enter your Proxy Address.
6. Enter Port.
7. Enter Username.
8. Enter Password.
9. You can uncheck Basic Authentication box if proxy doesn't work.
10. Click OK to save changes.
Change Password
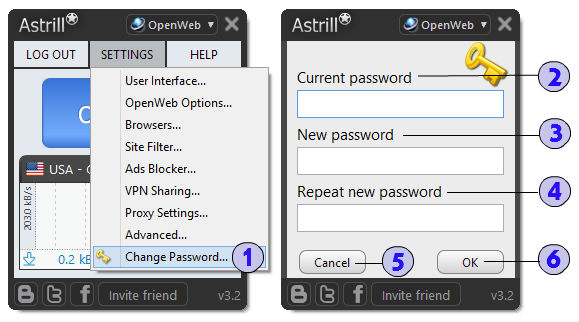
Astrill has a built-in feature where you can change your Astrill account's password within few seconds.
1. Click on SETTINGS menu and select Change Password option.
2. Type in your Current password.
3. Type in your New password.
- You are requested to set a password that is at least 8 characters long. It must contain at least ONE OF EACH of the following categories:
- lowercase alphabet letter: abcdefghijklmnopqrstuvwxyz
- uppercase alphabet letter: ABCDEFGHIJKLMNOPQRSTUVWXYZ
- number: 0123456789
- special character: !@#$%^&*()?.,_-=;+
4. Retype your new password in Repeat new password.
5. You can use Cancel button if you want to cancel/try to set again.
6. Click on OK button to save changes.
Router Setup Wizard
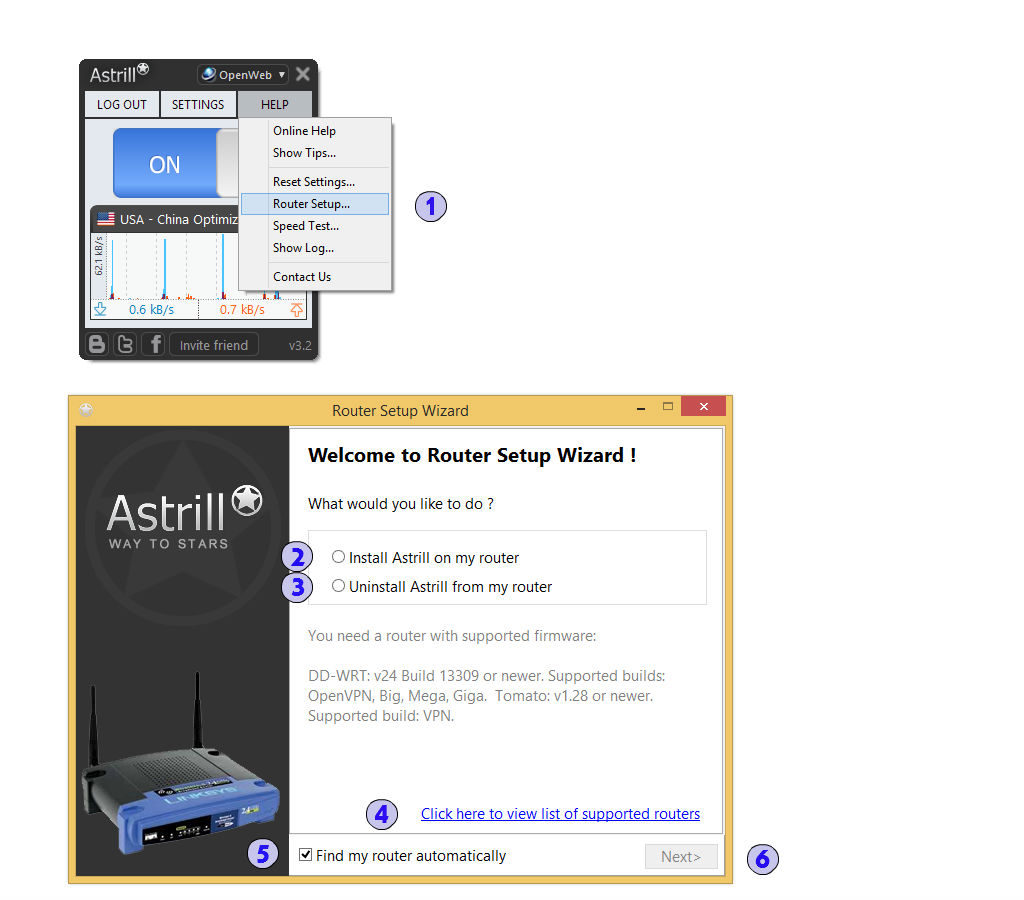
This is the quick and intuitive way to install Astrill vpn on Router. It is mandatory to have a router which is flashed with DD-WRT, Tomato or Merlin firmware and then you can use this Router Setup Wizard to install Astrill applet on your router.
1. Click on HELP menu and choose Router Setup... option to open Router Setup Wizard.
2. Select Install Astrill on my router, if you already flashed your router with the correct firmware.
3. You can choose Uninstall Astrill from my router if, for some reason, you need to uninstall Astrill applet on your router.
4. You can use Click here to view list of supported routers, to check if your router supports DD-WRT firmware.
5. Tick this Find my router automatically so that the system can install the applet on your router. This may require your router login details as well.
6. Click on the NEXT button to proceed to the installation process.
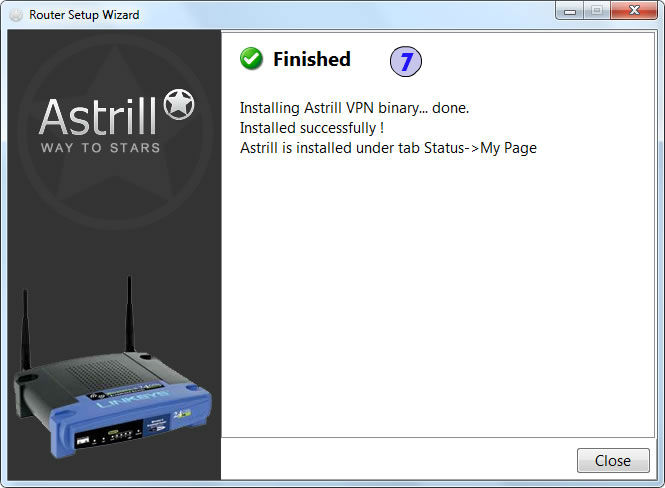
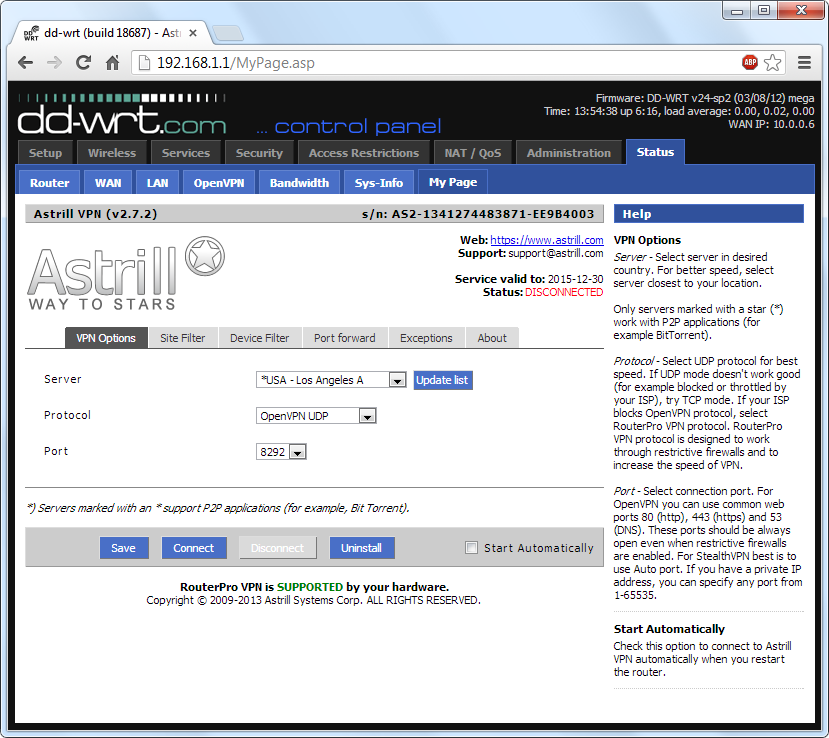
7. Once it is installed, you will be prompted that the installation is already finished. You will need to go to Status tab -> My Page tab from your router control page to access Astrill on your router.
This is how the Astrill VPN applet on DD-WRT firmware router looks like.
http://192.168.1.1/MyPage.asp
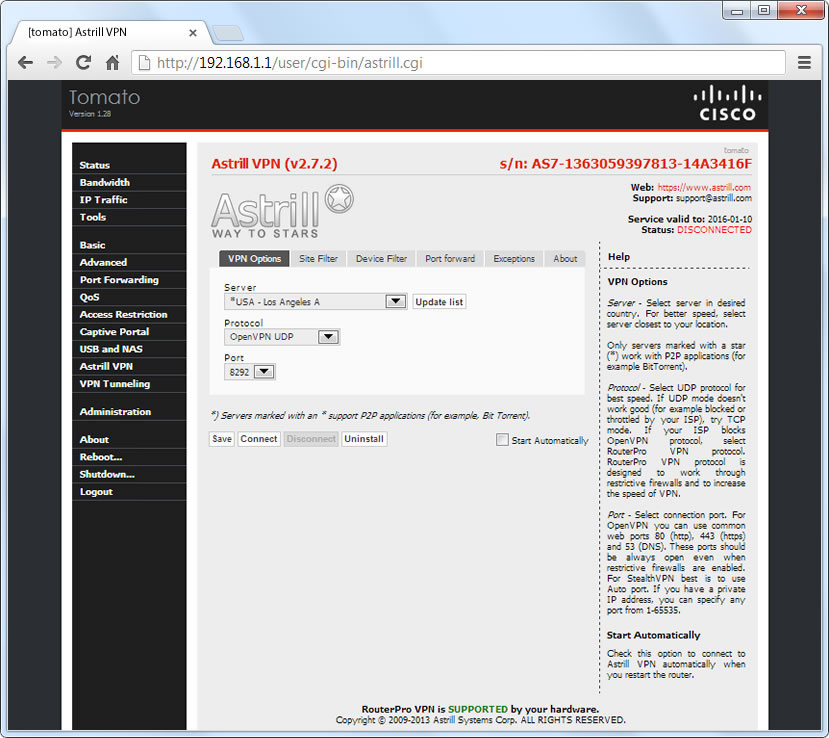
This is how theAstrill VPN applet on Tomato firmware router looks like.
http://192.168.1.1/user/cgi-bin/astrill.cgi
You need a router with supported firmware:
DD-WRT: v24 Build 13309 or newer.
Supported builds: OpenVPN, Big, Mega, Giga.
Tomato: v1.28 or newer.
Supported build: VPN.
You can click here to view list of supported routers
Note:
- Router MUST have 8 MB FLASH MEMORY for OpenVPN to be installed.
- Openvpn, Big, Mega and Giga build is required since OpenVPN binaries is not included in lighter versions of DD-WRT
Note2: We even provide pre-installed routers with Astrill VPN at very affordable rates. All Astrill VPN routers come preinstalled with Astrill VPN and ready to use immediately. You get access to all Astrill VPN servers (330 servers in 50 countries with free and unlimited switches), and you have option to add private IPs as well. You can order them from this page - https://www.astrill.com/astrill-vpn-routers.php
Speed Test
You can easily test Astrill VPN servers Speed and Ping using its unique Speed Test tool. This tool is more accurate than web based tools like speedtest.net.
File:Speed Test A.png
File:Speed Test 2 2.png
File:Speed Test 3 3.png
File:Speed Test 4 4.png
File:Speed Test 5 5.png
Navigation:-
1. Click on HELP tab and select Speed Test... option in the drop down list.
2. Select a country and its server from the drop down list. Then click on Test button to test the server speed or check Test Ping Only box and click on Test button to test only the ping of the selected server.
3. To test speed or ping of all servers at once, select All Countries option under Select Country drop down menu and click on Test All Servers button. For ping test only, check the Test Ping Only box and click one Test All Servers button.
4. Once the speed test is in progress, it will show the speed/ping result for all servers one by one. You can also find the best server under Download/Upload speed meter. Click on STOP button to cancel at any time.
Speed Optimizer
File:Speed Optimizer A.png
File:Speed Optimizer 2.png
File:Speed Optimizer 3.png
Astrill provides Speed Optimizer tool which can tweak your Operating System network stack and make your connection faster. This tool has good results on high-speed,high-latency Internet connections like your home ADSL line. You can always undo any changes made by the tool.
Navigation:-
- To optimize your connection go to Help and select Speed Optimizer... option.
- Confirm the prompt and click on Optimize button.
- Reboot your computer for the changes to take effect.
Note: Speed Optimizer tool is available only on Microsoft Windows.
Site Catcher
Site Catcher only works in OpenWeb mode!
File:Site Catcher A.png File:Site Catcher 2.png
File:Site Catcher 3.png
File:Site Catcher 4.png
File:Site Catcher 5.png
Here is how Site Catcher works:
1. Click on HELP tab and select Site Catcher option in Astrill application to open Site Catcher, select server you want the sites to go through, then visit a web site you want to catch all links for.
2. When done, click "Filter Sites".
3. On Sites tab, you need to review sites, and remove sites you think are not needed or you don't want to filter. After that click on "Get Ips" button.
4. On IP List, you have the IPs of the web site you want to filter, you can copy this and put in Astrill application Site Filter or on Router Site Filter. Make sure you connect to the same server you used to generate the IPs (some sites use CDN so IPs might be different on different servers).
5. Monitor will show you how many connections are still active/loading. If you press Reset button connections are terminated.
Online Help
Online Help option redirects you to Astrill website 'Setup' page where you can find configurations for all the devices that Astrill supports.
File:Online Help A.png
File:Online Help 2 2.png
Navigation:-
1. Click on 'HELP' tab.
2. Click on 'Online Help' in the drop down list.
3. You will be redirected to 'Setup' page on website.
4. Here you can find setup instructions for all the devices that Astrill supports.
Show Tips
Show Tips feature provides users with useful Tips & Tricks on each start up of Astrill application.
File:Show Tips A.png
File:Show Tips 2.png
Navigation:-
1. Click on HELP tab in Astrill application and click on Show Tips... option in the drop down list.
2. You can Enable or Disable Show Tips feature on application start up by Checking/Unchecking Show new tip every day box.
3. Click on <<Prev or Next>> button to read Previous or Next tip.
Reset Settings
This option enables you to reset settings to it's factory default.
File:Reset Settings A.png File:Reset Settings B.png
Navigation:-
1. Click on HELP tab and select Reset Settings... option.
2. Click on Yes or No / [X] button to Confirm or Cancel the prompt.
Show Log
Show Log feature shows the progress of connection.
File:Show Logs A.png
File:Show Logs B.png
Here is how it works:
- Click on HELP tab and select Show Log... option to open.
- Connect with a server in OpenVPN mode and disconnect to see the connection progress.
When done, it will show the connection progress and there you can see what is wrong.
You can also copy/paste and send this log to Astrill support for help in order to resolve the issue.
Note: Show Log is only for OpenVPN mode.
Contact Us
This option will redirect you to contact us page where users can contact Astrill support department via Email, Live Chat, and other options.
File:Contact US A.png
File:Contact US 2 2.png
Navigation:-
1. Click on 'Help' tab.
2. Click on 'Contact us' option in the drop down list.
3. You will be redirected to 'Contact us' page on website.
4. Fill in this form to contact Astrill support via email.
5. Here you can find contact details of different departments.
6. Click on Live Chat widget to talk to a Live Chat support representative.
